
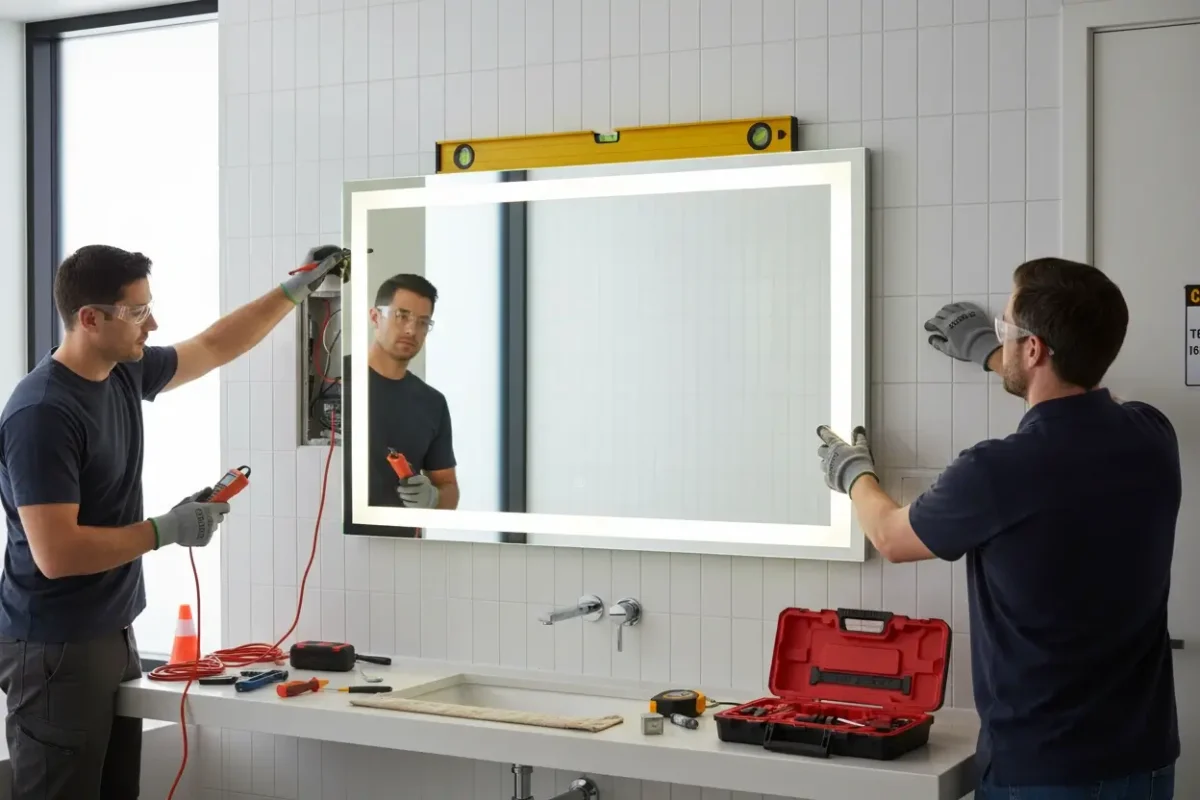
LED mirrors have revolutionized bathroom design, combining functionality with modern aesthetics. These illuminated mirrors provide superior lighting while adding a sleek, contemporary touch to any space. This comprehensive guide will walk you through the entire installation process, ensuring a safe and successful setup.
Pre-Installation Preparation
Before beginning your LED mirror installation, proper preparation is essential for a smooth and successful project.
Choosing the Right Location
The ideal location for your LED mirror should be:
-
Centered above your vanity or sink
-
At an appropriate height (typically 57-60 inches from floor to center of mirror)
-
Away from direct water sources to ensure electrical safety
-
In an area with adequate ventilation to prevent moisture buildup
Measuring and Planning
-
Measure your space carefully – Ensure the mirror fits properly and leaves adequate clearance
-
Check wall type – Identify whether you’re mounting on drywall, tile, or masonry
-
Locate electrical source – Determine if you’ll use an existing outlet or need hardwiring
-
Plan cable routing – Consider how wires will be routed and concealed
Tools and Materials Required
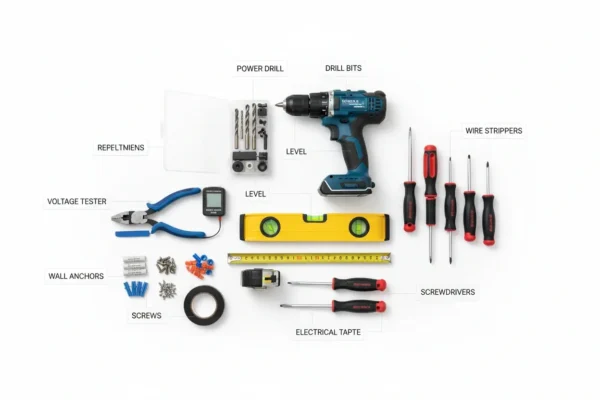
Essential Tools
-
Power drill with masonry and tile bits
-
Level (bubble or laser level)
-
Measuring tape
-
Pencil for marking
-
Screwdriver set (Phillips and flathead)
-
Stud finder
-
Voltage tester for electrical safety
Electrical Tools (if hardwiring)
-
Wire strippers
-
Wire nuts
-
Electrical tape
-
Multimeter (optional but recommended)
Materials
-
LED mirror with mounting hardware
-
Wall anchors (appropriate for your wall type)
-
Mounting screws
-
Junction box (if hardwiring)
-
Electrical cable (14/2 or 12/2 Romex for hardwired installations)
Safety Considerations
⚠️ IMPORTANT SAFETY NOTICE
LED mirror installation involves electrical work that can be dangerous if not performed correctly. Always prioritize safety:
-
Turn off power at the circuit breaker before beginning any electrical work
-
Test circuits with a voltage tester to ensure power is off
-
Use GFCI protection in bathroom environments
-
Consider professional installation for hardwired connections
-
Follow local electrical codes and obtain permits if required
Step-by-Step Installation Process
Step 1: Turn Off Power and Prepare the Area
-
Switch off the circuit breaker that controls the bathroom lighting
-
Test the circuit with a voltage tester to confirm power is off
-
Clear the work area and protect surfaces from damage
-
Remove existing mirror if replacing an old one
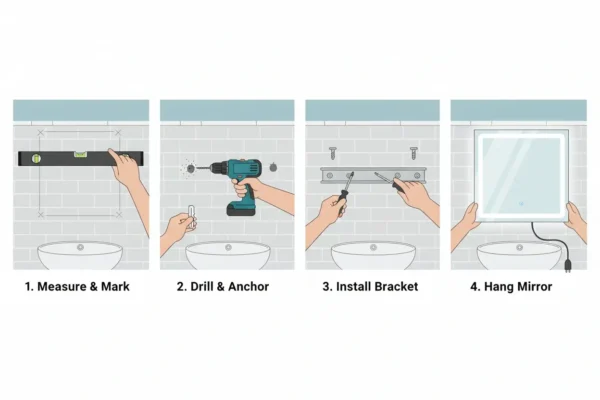
Step 2: Mark the Installation Location
-
Measure and mark the center point where the mirror will be mounted
-
Use a level to ensure your markings are straight and properly aligned
-
Mark mounting holes according to the mirror’s bracket specifications
-
Double-check measurements before drilling
Step 3: Install Wall Anchors and Mounting Bracket
For drywall installation:
-
Drill pilot holes at marked locations
-
Insert heavy-duty wall anchors suitable for the mirror’s weight
-
Mount the hanging bracket securely to the wall
-
Verify the bracket is level using a bubble level
For tile or masonry walls:
-
Use appropriate masonry bits and drill slowly to prevent cracking
-
Install masonry anchors or toggle bolts
-
Apply gentle pressure when tightening to avoid tile damage
Step 4: Prepare Electrical Connections
For Plug-in Models:
-
Simply ensure a nearby GFCI outlet is available
-
Plan cable routing to keep cords neat and safe
For Hardwired Models:
-
Install junction box if not already present
-
Route electrical cable from the switch to the mirror location
-
Leave adequate wire length (6-8 inches) for connections
-
Secure cable to prevent strain on connections
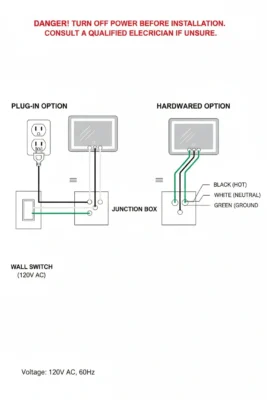
Electrical Wiring Guide
Understanding LED Mirror Wiring
Most LED mirrors use low-voltage LED strips powered by an internal driver that converts standard household voltage (110-240V) to the required LED voltage (typically 12V or 24V).
Wiring Methods
Method 1: Plug-in Connection
-
Easiest option for DIY installation
-
Connect mirror’s plug to a nearby GFCI outlet
-
Ideal for rental properties or temporary installations
-
Requires cord management for clean appearance
Method 2: Hardwired Connection
-
Professional appearance with no visible cords
-
Requires direct connection to home electrical system
-
Must be performed by licensed electrician for safety and code compliance
-
Provides integrated switch control
Wiring Process for Hardwired Installation
⚠️ This should be performed by a qualified electrician
-
Connect hot wire (black) from wall to mirror’s black wire
-
Connect neutral wire (white) from wall to mirror’s white wire
-
Connect ground wire (green/bare) to mirror’s ground or mounting bracket
-
Secure all connections with appropriate wire nuts
-
Wrap connections with electrical tape for added safety
-
Test connections before finalizing installation
Grounding Requirements
-
Metal-framed mirrors typically require grounding connection
-
Class II mirrors may not require ground connection (check manufacturer specs)
-
Always follow manufacturer’s wiring diagram for your specific model
Testing and Final Adjustments

Step 5: Mount the Mirror
-
Carefully lift the mirror (use assistance for large mirrors)
-
Align with mounting bracket and secure according to manufacturer’s instructions
-
Install safety brackets or anti-theft screws if provided
-
Verify mirror is level and securely mounted
Step 6: Test All Functions
-
Restore power at the circuit breaker
-
Test LED lighting – ensure even illumination without flickering
-
Check touch sensors (if equipped) for proper responsiveness
-
Test additional features such as:
-
Anti-fog functionality
-
Dimming controls
-
Color temperature adjustment
-
Bluetooth connectivity (if applicable)
-
Step 7: Final Cleanup
-
Remove protective film from mirror surface
-
Clean mirror with appropriate glass cleaner
-
Organize tools and dispose of packaging materials
-
Document installation for warranty purposes
Troubleshooting Common Issues
LED Lights Not Working
Possible Causes and Solutions:
-
No power – Check circuit breaker and outlet connections
-
Loose wiring – Verify all electrical connections are secure
-
Faulty LED driver – May require professional replacement
-
Blown fuse – Check and replace internal fuses if accessible
Flickering or Dimming Lights
Common Solutions:
-
Check connections – Ensure all wires are properly connected
-
Voltage issues – Verify proper voltage supply with multimeter
-
LED driver problems – May need replacement by professional
-
Interference – Check for nearby electrical devices causing interference
Touch Sensor Not Responding
Troubleshooting Steps:
-
Clean sensor area – Remove dust, moisture, or residue
-
Check power supply – Ensure sensor is receiving power
-
Reset mirror – Unplug for several minutes, then reconnect
-
Calibrate sensor – Follow manufacturer’s calibration procedure
Anti-Fog Feature Not Working
Solutions:
-
Check connections – Verify anti-fog element is connected to power
-
Temperature differential – Allow time for feature to activate
-
Clean mirror surface – Remove any coating that might interfere
-
Professional diagnosis – Internal heating element may need replacement
Maintenance and Care
Regular Cleaning
-
Use ammonia-free cleaners to avoid damaging LED components
-
Clean with soft, lint-free cloths to prevent scratching
-
Avoid harsh chemicals that could damage mirror coatings
-
Clean LED areas gently to maintain optimal brightness
Preventive Maintenance
-
Ensure proper ventilation to prevent moisture buildup
-
Check connections periodically for signs of corrosion
-
Monitor LED performance for dimming or color changes
-
Keep firmware updated for smart mirrors with connectivity features
Long-term Care
-
Professional inspection every 2-3 years for hardwired installations
-
Replace LED drivers when they reach end of life (typically 10-15 years)
-
Update electrical connections if showing signs of wear
-
Document maintenance for warranty coverage
Installation Cost Considerations
DIY vs. Professional Installation
DIY Installation:
-
Plug-in models: $0-50 in additional materials
-
Basic tools required: Most homeowners have necessary tools
-
Time investment: 2-4 hours for typical installation
Professional Installation:
-
Hardwired installation: $90-150 per hour
-
Complex installations: $200-400 total cost
-
Includes: Proper wiring, code compliance, warranty coverage
When to Hire a Professional
Consider professional installation if:
-
Hardwiring is required
-
New electrical circuits need to be installed
-
Complex mirror features require specialized knowledge
-
Local codes mandate professional installation
-
You’re uncomfortable with electrical work
Installing an LED mirror can significantly enhance your bathroom’s functionality and aesthetics. With proper preparation, the right tools, and careful attention to safety, many installations can be completed as DIY projects. However, never hesitate to consult with or hire a qualified electrician for electrical work, especially hardwired connections.
Remember that a properly installed LED mirror will provide years of reliable service, improved lighting, and modern convenience. Take your time with each step, prioritize safety above all else, and enjoy your new LED mirror installation.